Creating a floating wooden shelf can enhance any room, providing both functionality and aesthetic appeal. This project is suitable for DIY enthusiasts of all skill levels and allows for customization based on personal style and space needs. Crafting your own shelves not only saves money but also gives you the satisfaction of building something unique for your home.
Gathering Materials and Tools
Before you start, it’s essential to gather all necessary materials and tools to ensure a smooth building process. You will need wooden boards, brackets (preferably concealed), screws, a studs finder, a level, a drill, and sandpaper to finish the wood. Choose high-quality wood like oak or pine for durability and a polished look. Preparing your workspace with all tools within reach can greatly streamline the installation process.
Measuring and Cutting the Wood
The next step involves measuring and cutting your wooden boards to the desired length. It’s crucial to measure the wall space accurately where you plan to install the shelves, ensuring they fit perfectly. Use a saw to cut the boards, and don’t forget to sand the edges to prevent splinters. If you want a rustic look, consider leaving the wood untreated or applying a wood stain to enhance its natural beauty.
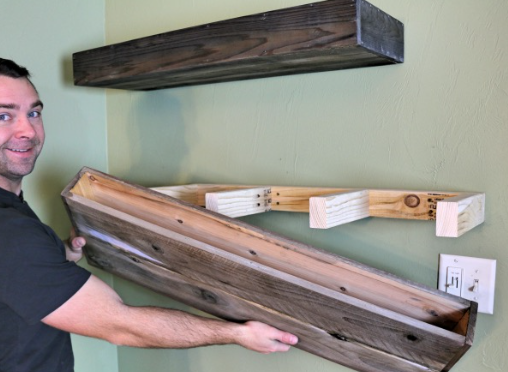
Installing the Shelf
Once your wood is prepped, it’s time to install the floating shelf. Use a studs finder to locate the wall studs, as this will provide the necessary support for the shelf. Mark the locations for the brackets and drill holes accordingly. After securing the brackets into the wall, carefully place your wooden shelf on top, making sure it is level. Double-check everything before using it to ensure stability and safety.
Floating wooden shelves can dramatically elevate the look of your space while providing functional storage. Whether you choose to display books, plants, or decorative items, these shelves can be tailored to suit your home’s aesthetic. Dive into this rewarding project and enjoy the outcomes in your own space!